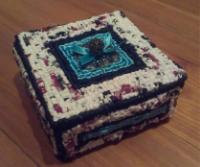
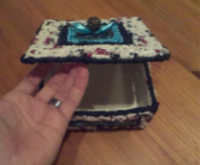
Try the locker hooking technique and create an original and practical tealight box!
In this step-by-step tutorial, we'll show you step by step how to use canvas, yarn, and a hook to make a beautiful decoration that will brighten up your home. This technique is simple, fun and can be done by anyone. Start creating and in no time you will have your own handmade box that you can use yourself or give as a unique gift.
If you're not sure how to get started, check out the beginner's video.
I really like it when I have several tea candles burning at home. I always buy a larger number of them in a bag, but I always wondered where to put them so that the shape of the candles wouldn't bend and so that they wouldn't get in the way in the chest of drawers. So I tried to make a decorative, looped box to store the candles, which lies on my chest of drawers and I have the candles nicely hidden in it and at the same time always at hand. However, the cartridge can be used in many other ways.
Dimensions: approx. 16 × 16 cmHeight: approx. 6 cm
USED TECHNIQUES
- Preparation of a square or rectangular foundation
- Base flashing
- Spiral looping
- Hiding loose ends
- Building projects
- Decorating projects
LIST OF MATERIALS
- Kanava #2
- Fabric stripes made of fine cotton in a width of 1.5 cm (ideal for recycling old pieces of clothing and fabrics for which you no longer have use)
- 1 package of 10 m satin satin ribbon in medium blue color
- 1 package of 10 m satin satin ribbon in black
- Locking media
- Looping hook
- Tapestry needle
- Sewing needle
- Scissors
- Quick-drying permanent textile adhesive
- Decoration of choice – filigree, flower, bead, etc.
- Permanent marker
MANUAL
- Cut six pieces of canvas: two pieces of canvas 38x38 squares, four parts of canvas of 38x20 squares for the sides of the cassette.
- Fold the edges of each canvas piece by folding it in the row marked in gray in the pattern.
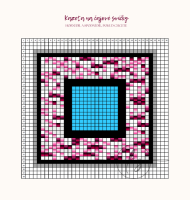
- Loop the top piece using the spiral method according to the template. You can loop the lower ones either in the same way as the upper ones, or you can use only the main cotton stripes to save time. They will not be visible, the box will lie on this part.
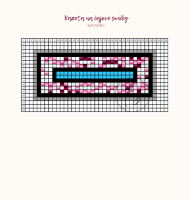
- Loop all four parts in the same way according to the template on the next page.
- Hemmed the top part of the box on all sides with a black satin ribbon stitch. If you want to attach the lid to the box firmly, hem the top part only on three sides. You will sew on the fourth side with the stitch at the end.
- Align the two looped side pieces along the short sides of each other. Thread a strip of ribbon into a tapestry needle. Make a stitch through the edges of the bases of both parts.
- Continue sewing the two pieces together, sewing in the same direction to keep the decorative material smooth around the edges.
- Make sure the edge is neatly covered when sewing, and make extra stitches where needed to cover the edge completely.
- Once the stitching is complete, continue sewing in the same style with the other sides. After sewing four short sides, you will get a square without a bottom and lid.
- Align the bottom piece in a square and sew all four long sides to the bottom with a stitch stitch around. In the corners, you can pull the ribbon through one eyelet several times to fully cover the corner from both sides.
- Decorate the upper part of the box as you like by sewing or gluing filigree, flowers, beads, etc. There are no limits to creativity.
- Then choose the way you want to attach the top part of the box to the body. You can use on two sides a couple of inches from the edges by threading a satin ribbon through the lid and side and making a knot inside the box for a hidden closure. Two rings can be used. Alternatively, connect firmly by sewing with a stitch stitch.
- If you want to have the box with a cap, use either a black satin ribbon eyelet, which you attach in the middle to the edge of the upper part and sew a button or filigree bead to the side front part, over which you will pull the eyelet. The lid to the box can also be tied with a bow, etc. Even in this case, use anything you like.
DRAWINGS


The complete manual is also available for download in PDF format - see below - in Czech and English
-3.png)